
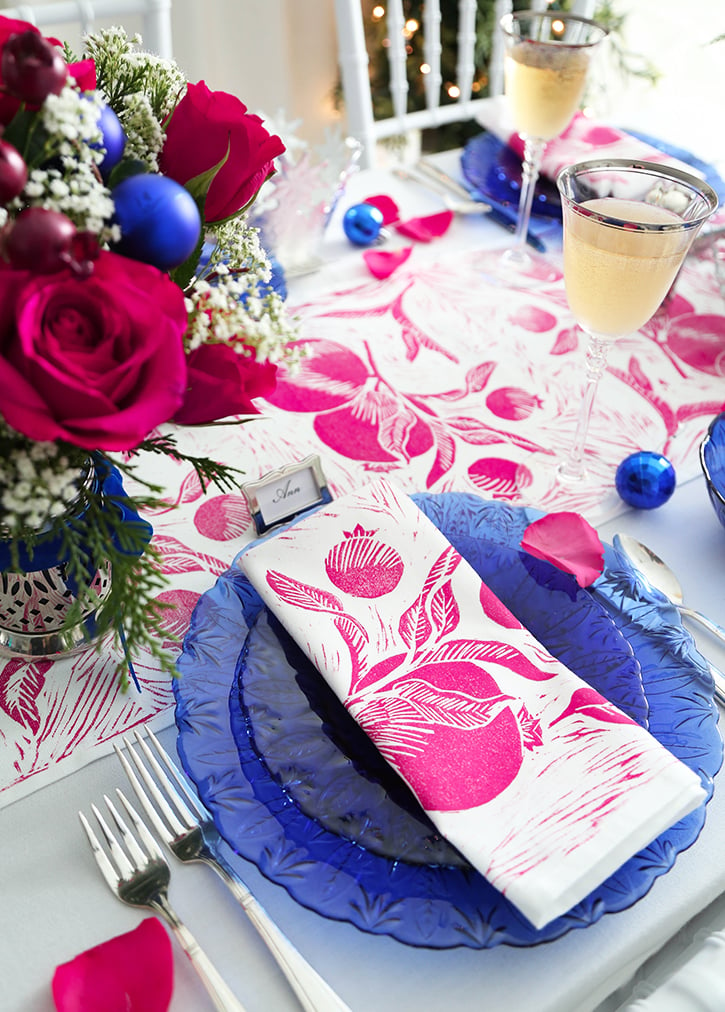
A DIY Block Print Table Runner recreates the look of expensive table linens you will find for sale on boutique websites. Using linocut to achieve the handmade look is a more cost effective way to customize a set of plain table linens. In this article I’ll show you the basics of block printing on fabric so you can make your own!
Block printing on fabric is a wonderful way to make bespoke table linens. This can allow you to use your own creativity to match a color scheme or theme for a tablescape of your choice. It’s a true art form and a valuable skill to learn. But first, here’s a bit of history about this ancient printing technique.
A Brief History of Block Printing
Block printing might be oldest method of producing multiples of an image. It originated in China over four thousand years ago, with the use of carved wooden blocks for printing textiles and books. The technique spread and was adapted throughout Asia over the centuries. India has become renowned for exquisite printed textiles, and Japan for their mastery of woodblock printing as an artform. The concept of block printing was introduced to Europe by Marco Polo when he returned to Italy in the 13th century.
For a more familiar example, kids might even do simple potato printing in elementary school, and everyone is familiar with rubber stamps from the craft store. These are variations on the same concept. Linocut is also a direct way to print without a printing press or more elaborate equipment or processes. It involves using a sheet of linoleum to carve out an image to print. You might have tried this in a middle school art class.
This project however is of a more intermediate level. It requires a bit more experience with carving and printing, but it’s not too difficult. If you’ve never done linocut before, I would recommend starting with a small block and printing on paper as practice before printing on a larger scale and on fabric. If you want to try your hand at it, beginner kits are available online and in most art supply shops.
Lino carving 101.
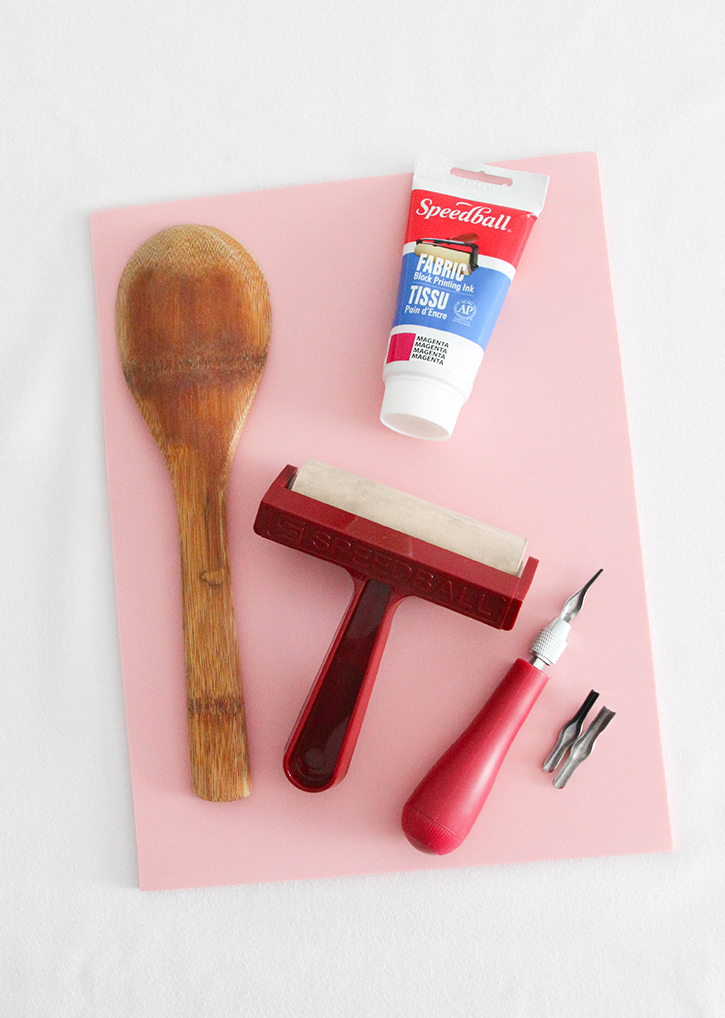
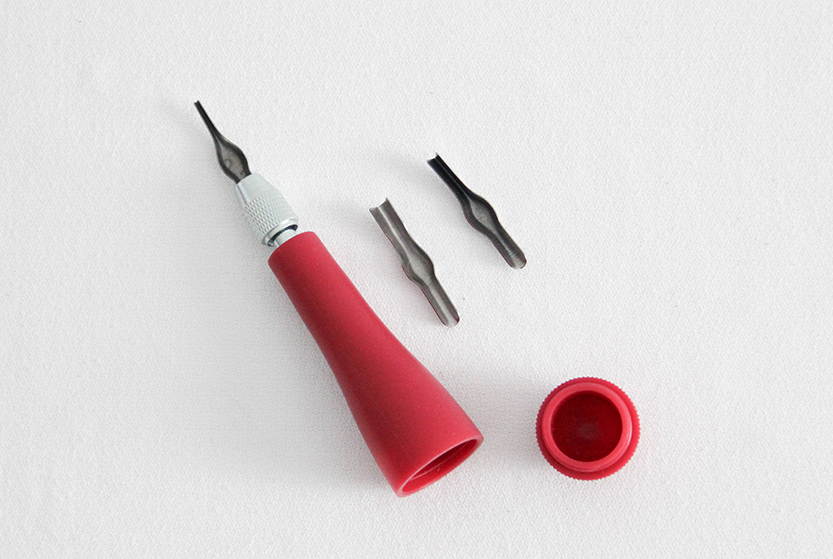
I used a few basic tools for this project. You will need a soft rubber brayer or ink roller, and a lino cutting tool with changeable blades. I was going to use a conventional linoleum block, but I used this 9″ x 11.75″ Speedball Speedy Carve block which fits perfectly within the width of the table runner. Speedy Carve blocks are available in different sizes, and softer than linoleum. It’s much easier to carve for all skill levels, and safer to carve too!
I also used Speedball’s fabric printing ink. Which is water soluble and easy to clean off the printing block and roller. I used this Magenta ink but there are many different colors to choose from. You will also need a bench hook or a small clean sheet of plexiglass. Or use glass to use as an inking plate. A baren or a large flat spoon, hard rubber roller or even a rolling pin will be needed for transferring the print to the fabric.
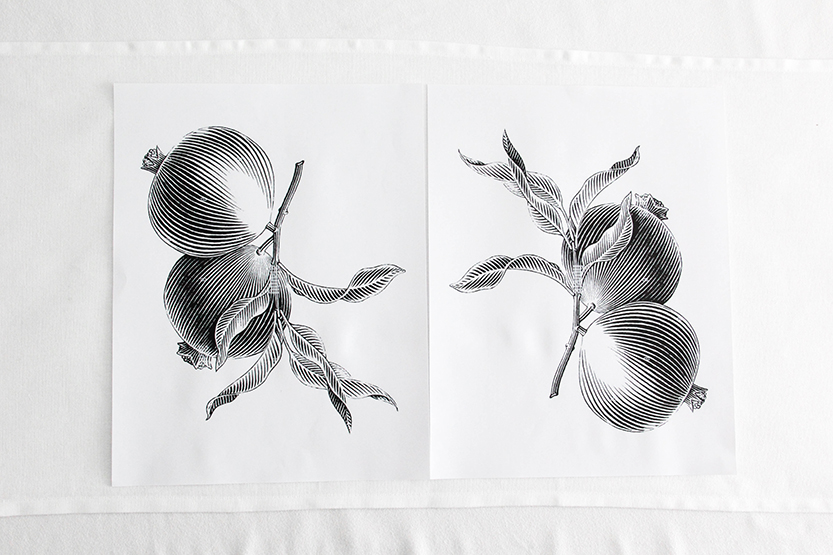
Choose a design.
You can hand draw your own design or you can find a copyright-free design online and print it. Make at least two copies to lay out on the runner to see how the image will space. And how many times you will need to print it. Lightly marking the runner with a pencil as a guide for placing the block for each printing will help speed things up.
Simple designs work best. Or a stand alone shape or composition that doesn’t have to line up perfectly with repetition of each print. If you are worried about the precision of printing, chose one bold image that doesn’t have to align perfectly with each printing.
If your design is more simple, just draw it directly onto the block with a pencil and skip the next three steps. One key thing to keep in mind though, is that the image will print in reverse. This is especially important to remember if you’re printing text, letters or numbers.
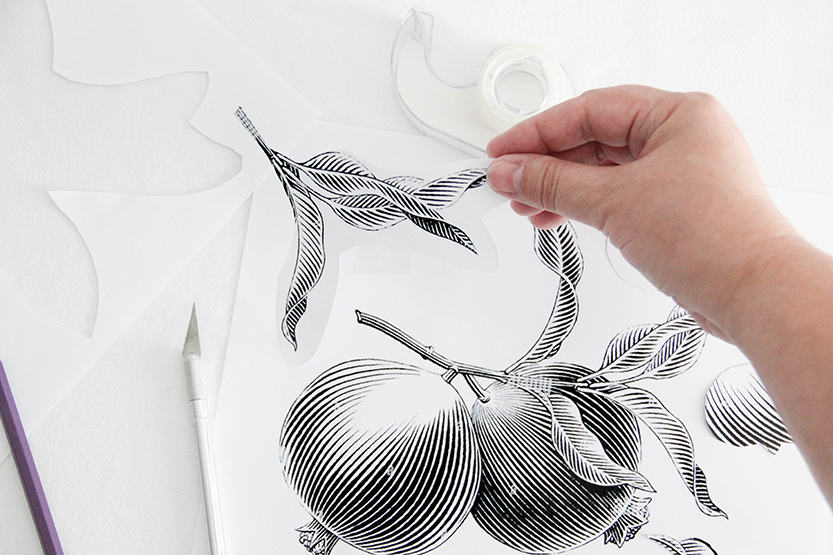
To add elements to the design, use extra copies to cut out the pieces you want to add. Make sure to leave some blank paper margin around the elements. Place the pieces on a copy with the main design on it and tape them into place if you like. Anything printed with a regular inkjet or laser printer can be used as a kind of iron-on transfer to get the design on the block. This works especially well with a more detailed digital image like the one I used. There a few tutorials like this one that you can watch online if you want to see how this transfer process works.
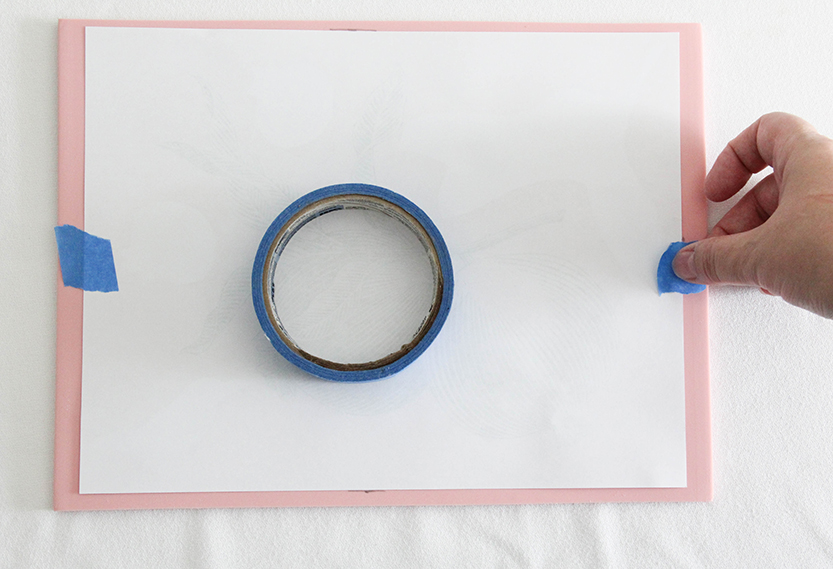
Affix your design to the carving block
Tape the paper down with painters tape to hold in place. This will keep design from shifting as you transfer it to the block. Make some small marks at the edges of each side of the paper with pencil as a registration to line the paper back into place if it comes loose.
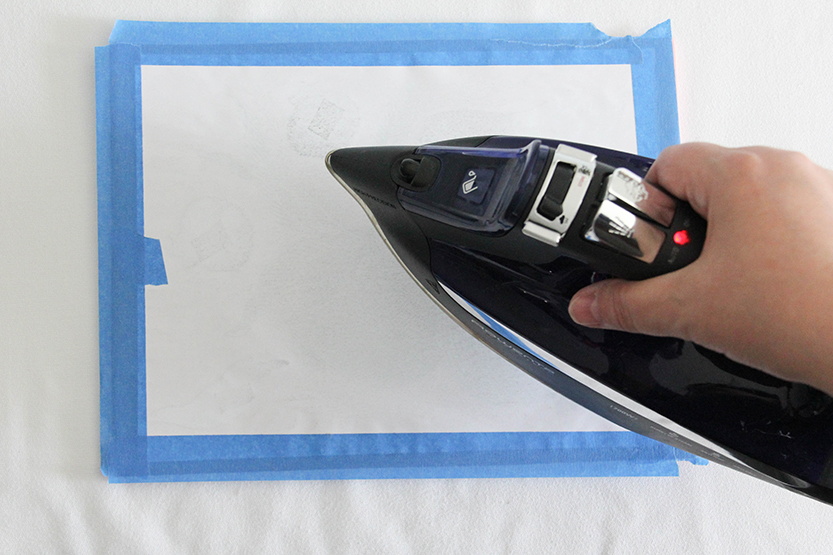
Iron the back of the copy on a medium setting without steam. It will take many passes, lots of patience and elbow grease, but the process will lightly transfer the image to the carving block. Try not to iron directly on exposed block, it will leave a crumbly texture on the block as well as a residue on the iron. Cover the exposed block with tape if necessary.
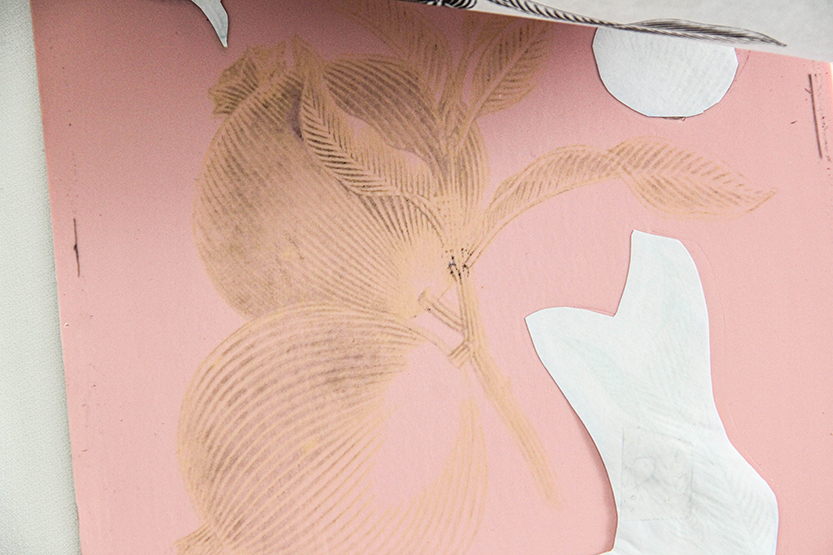
Occasionally peel one end of the paper up to check how the image transfer is progressing. Transfer results with this process can vary, leaving a light to medium impression on the carving block.
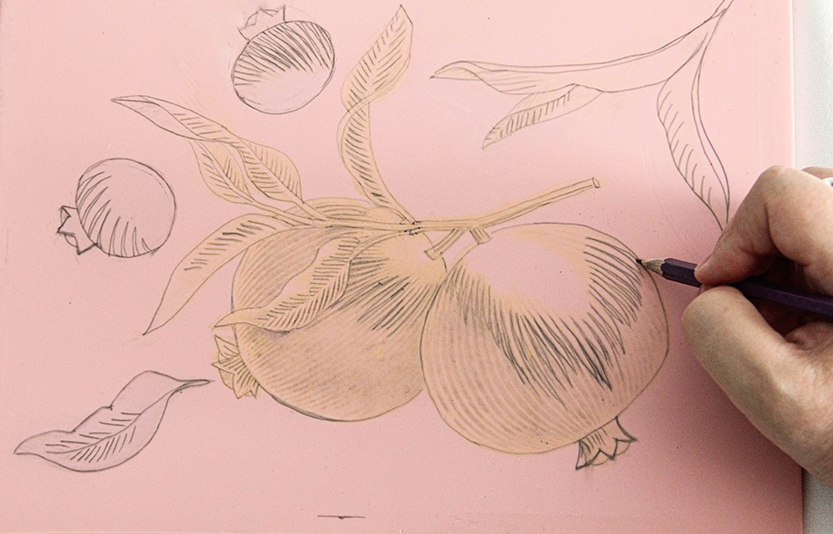
Clarify the impression with pencil outlines.
If the image transfer is too light, you can clarify or simplify the design by drawing over it with a pencil.
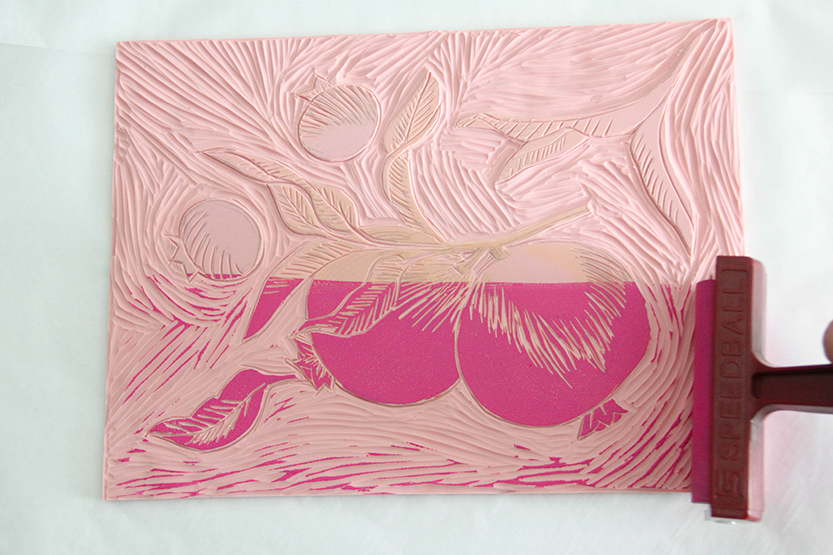
Carving heads.
A basic lino cutting kit will include a handle that is hollow for storing different cutters. They are available online right here, or at most art and craft supply stores. It will have a hand adjustable chuck on it for easily replacing the carving blades. There are different blades available from Speedball for cutting out different widths of line. The #1 small v blade is thinner for carving out fine detail, and the #2 large v cuts a bolder line. The #3 small U gouge cuts thicker lines, and is useful for carving out areas of the block to create negative space. These three blades are a good basic set for most linocut projects. The kit might also include additional types of blade.
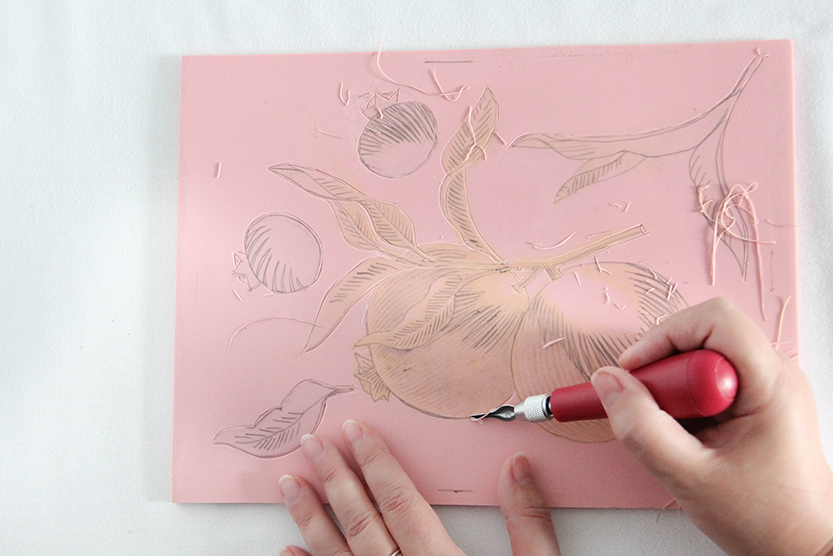
Begin carving your design.
Begin by carving the outlines of the shapes. A #1 cutter works well for precision cutting and carving out small areas of negative space.
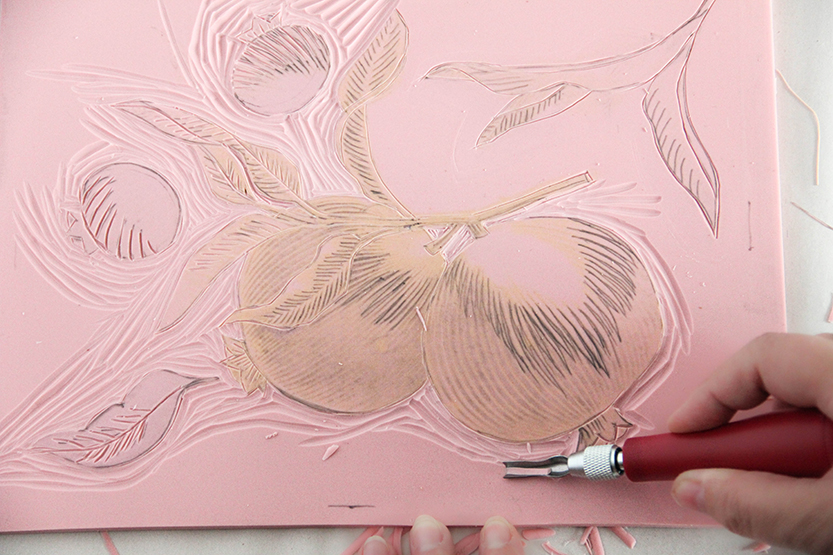
Carve out the negative space or the background area next. Using the #3 U gouge will leave raised lines to create “chatter” in the areas you carve out with it. This leaves a more organic texture in the background that is part of the distinctive look of relief printing. You can go back and carve down the raised lines for a cleaner look if you prefer.
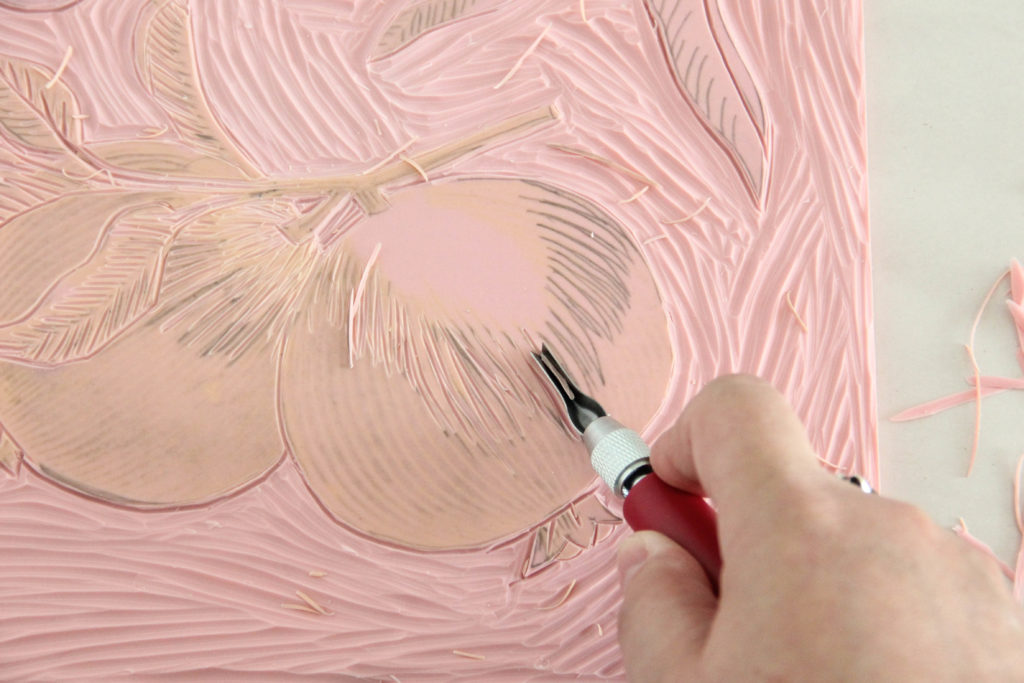
Detail work.
Any solid uncarved areas and raised surfaces left will print in color, creating the image you want to print. As a last step, carve out the details or highlights in these areas of your composition. Use a #1 cutter for fine detail or small spaces, and a #2 V blade for larger, more bold white lines.
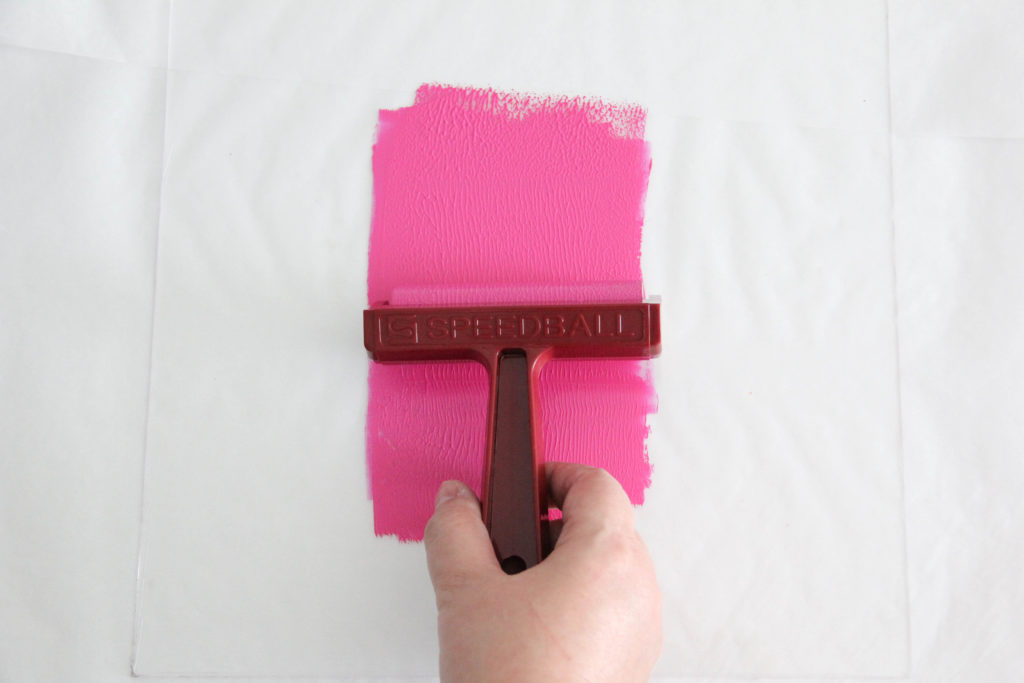
Prime your ink roller.
Squeeze out about an inch of ink onto your inking plate. Roll out the ink into a strip that has a thick even layer to it. This will prime your ink roller. Repeat this process as needed to ink up the printing block.
Load your block with ink.
Roll the ink onto the block until all the raised areas have a uniform, orange peel like texture. Reload the roller with ink and repeat as necessary until the whole image is covered. Roll the brayer in one direction over the block. It’s like using a roller to paint a wall-don’t roll the brayer back and forth over the block, because will remove a layer of ink from it!
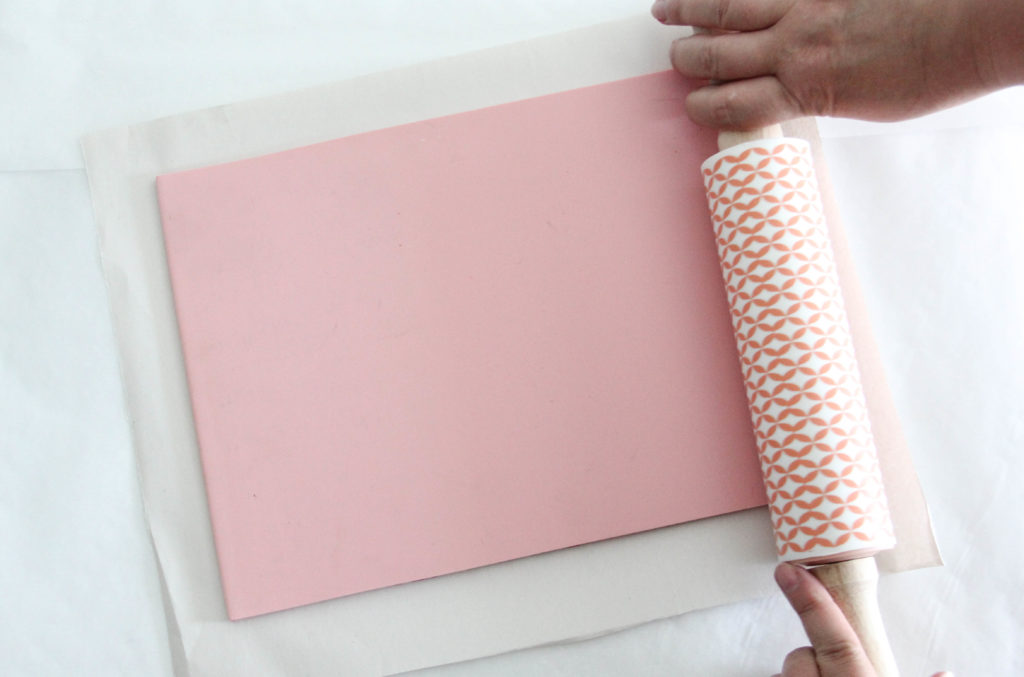
Make a test print on paper.
Paper printing usually involves laying paper on top of block, but printing on fabric works by laying the block on the fabric. Proof your image by printing it on paper before you print on fabric. This way you can see what results currently look like, and if there are details to refine or areas you might want to cut out. Carefully lay the printing block facedown onto a piece of paper. Evenly roll the back of the block with an ink roller, baren or spoon to transfer the ink. I used a small rolling pin, since this is a larger image. This also a good way get practice lining up the printing block on fabric.
Speedball fabric ink washes off with soap and water. Clean and let dry thoroughly after washing the ink off before making any changes to the image. I also recommend cleaning the block if you have a long break between printing, so that ink doesn’t dry on the block or trap lint.
Apply the block to the table runner fabric.
A smoother fabric weave will print the image more clearly. A coarser weave like linen will print with more texture. It’s smarter to avoid printing on any fabric with too much texture or slubbing for the best results.
This 13″ X 72″ linen textured cotton table runner I printed on is available online, right here. White is always a good basic color for table linens, but any light to medium fabric color you print on will end up looking nice. Bear in mind though, a light ink printed on dark fabric will be more transparent, and the results generally don’t look as good in a finished piece.
Before you begin, make sure the fabric is clean, and there are no stickers or labels on it. For best results, prewash it. Iron the fabric flat and smooth as possible before printing on it. Lay it out completely flat on a clean work table with plenty of space before you get started.
Print proofs on paper until the image prints more solid, and then charge the printing block up with ink.
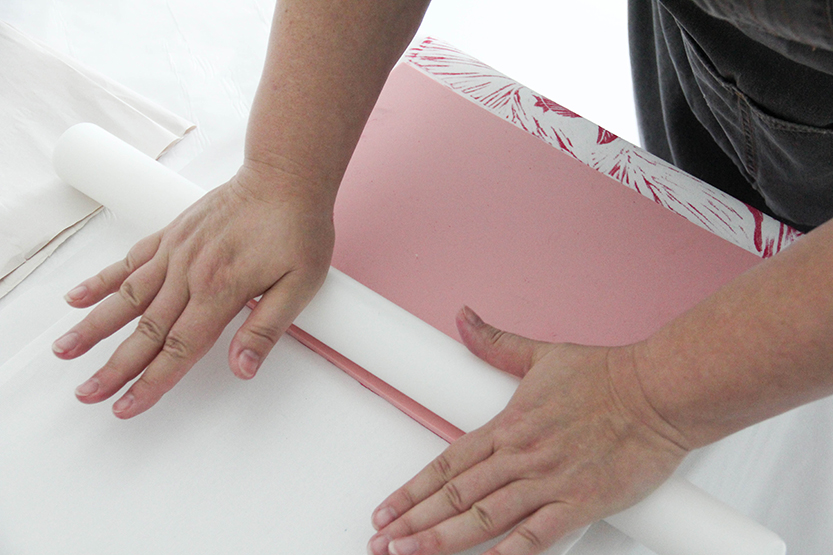
Start printing in the middle of the runner. Carefully align and lay the printing block facedown flat on the fabric. Roll over the back of the block with the ink roller, or in this case, a rolling pin! You could also use the flat of the spoon. Apply pressure to the block, but do not press too hard, because this type of printing block is very soft.
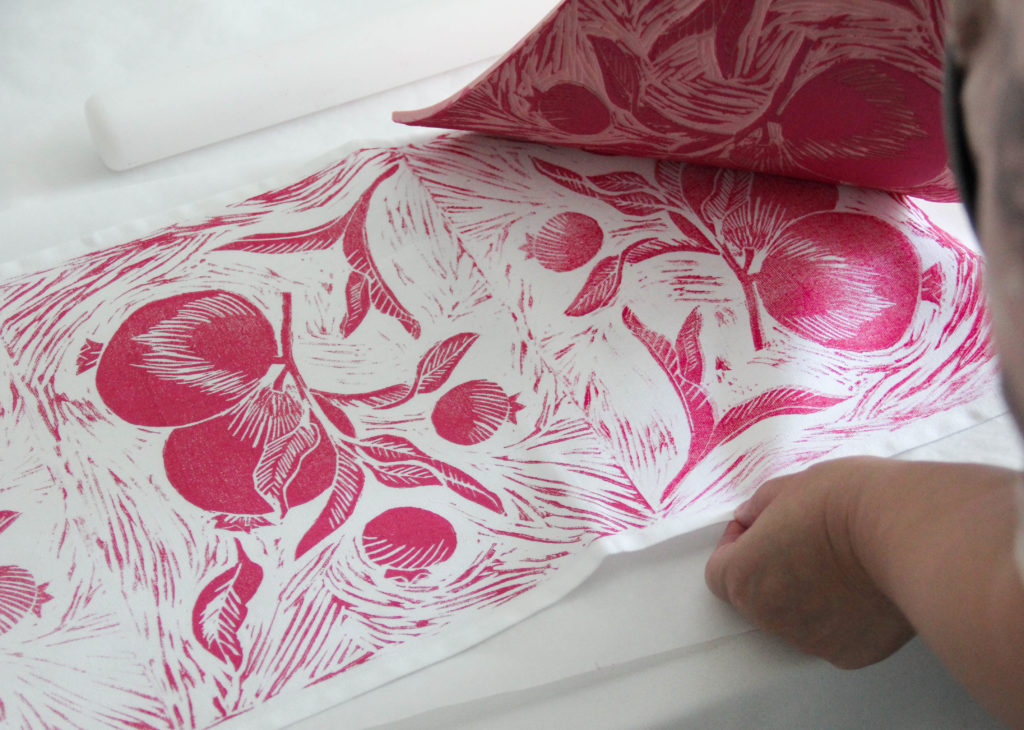
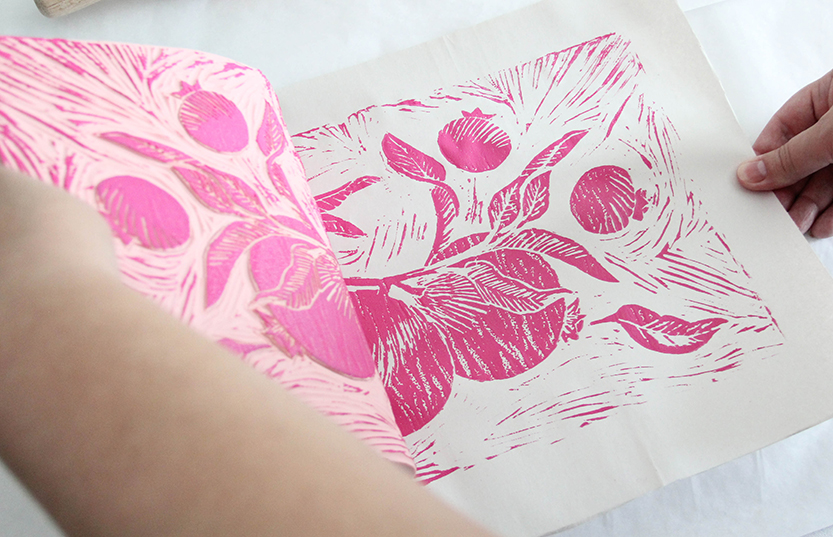
Reveal the design.
Carefully peel up the block from the fabric by pulling it up from the corners of the block.
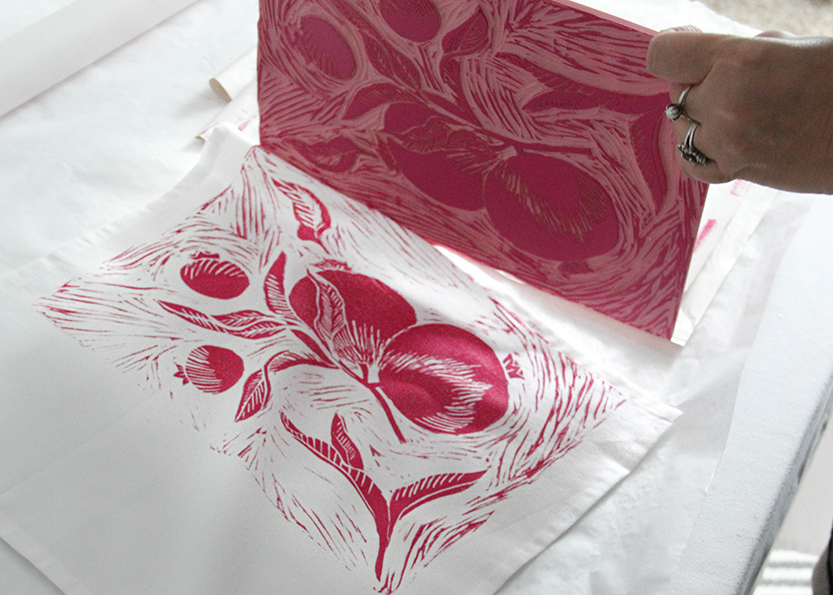
Next, charge the block up with ink again, line it up with the edge of the previous printing, and repeat the process until you reach end of the runner. Starting on the other end of the first printing, turn the block facing the opposite direction to print the other side of the runner. This will create a symmetry to the repeated image on the runner.
Make matching napkins.
Use the same process to print napkins. These 14×14-inch size white cotton napkins are also available online, at this link. Center the block to one end of the fabric or in the middle of each napkin, using the same method from printing the table runner.
Lay the printed fabric out to let the ink dry and cure up for at least a week. Before washing, I would recommend heat setting the ink. Do this by turning the fabric facedown and ironing the back of it, with the iron on a hot setting for two minutes. It’s a good idea to lay a press cloth or paper under the fabric on the printed side to protect your ironing board. This will prevent the image from fading with repeated washing. Wash on a cool setting with mild soap, or hand wash.
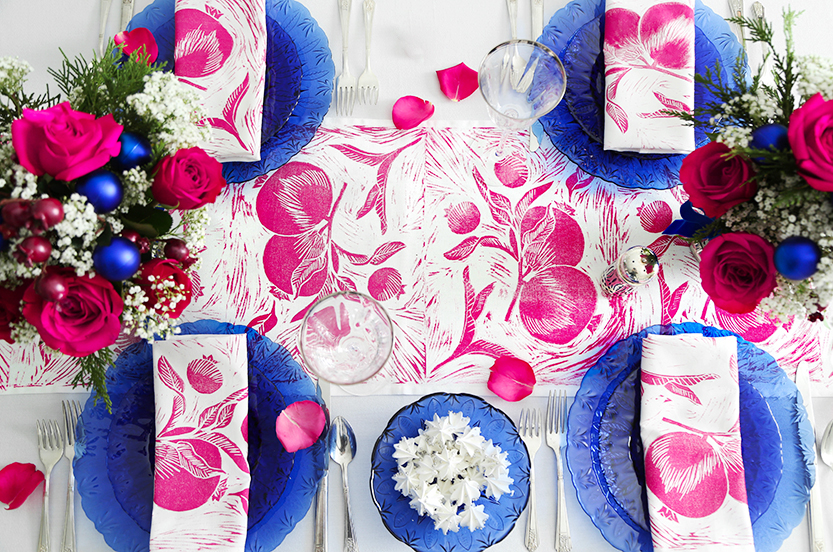
Making a DIY Block Print Table Runner and Napkins is a creative way to create custom table linens you can use annually for a specific holiday, or you can choose an evergreen design that can grace your tabletop for many special occasions through the years. Or, you can design and print a set to give as a very special gift!
For another DIY table linens idea, you might try making your own version of these dip dyed dinner napkins!
That is awesome. Very pretty.
Thank you!