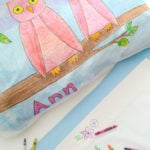
Kid's Custom Crayon Pillowcase
Kids can create and personalize their own artwork on a cotton pillowcase!
Cost: variable
Equipment
- steam iron
Materials
- 1 or more pillowcases 100% cotton pillowcase, white or light color
- 1 pack assorted color crayons
- 2 or more large sheets newsprint or several sheets of sketchpad paper
- 1 steam iron
- 1 sketch pad or notepad
- 1 pen or pencil
Instructions
- Wash and dry 100% cotton pillowcase(s), and steam iron to remove wrinkles to create a smooth coloring surface.
- Have older children draw images or designs they would like to put on their pillowcase, and choose their favorite one. Little kids can skip this step if they want to, and go directly to step 4!
- Lay the pillowcase on a smooth, hard surface like a table top or desk top. Have the child lay their drawing beside the pillowcase, and copy the outline of the image in a light crayon color on the pillowcase.
- Next, they can color everything in, starting with the main image, then coloring in the background. If kids want brighter colors, extra layers of crayon will add more intensity to the colors. Outlining the main parts of the image with black will make it pop!
- When all the coloring is finished, an adult should lay newsprint flat inside the pillowcase to prevent the image from transferring to the back during the ironing process.
Put newsprint or sketch pad paper over the colored part of the pillowcase to protect iron from crayon wax. Tape the paper down to prevent shifting. With the iron on the cotton setting, carefully iron over the entire surface of the protective paper to set the crayon wax into the fibers of the pillowcase. Repeat the process three or four times, so that the colors are well set into the fabric. - Remove paper and hand wash or machine wash the pillowcases on a gentle cycle in cold water. Do not use bleach. They can be tumble dried on a cool setting, but turn the pillowcases inside out beforehand. It is best to air dry or line dry the pillowcases to protect the artwork.
Notes
!00% cotton percale pillowcases work best for this project, because natural cotton fibers and the smooth, tight weave is easier to draw on, which makes the pigment in the crayons absorb better. It is better to start coloring with lighter colors first, adding darker colors later. Mistakes can be corrected by carefully scraping the wax off and coloring over with a white crayon (it's like crayon correction tape), then coloring right over that. Outlining in black, or adding any black crayon is best saved for last in the coloring process because black crayon can mix with lighter colors and muddy them.