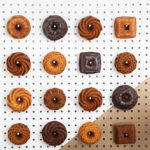
DIY Mini Bundt Cake Wall Bar
Delight dinner guests wtih a mini bundt cake bar made with precut pegboard.
Yield: 1 pegboard wall bar
Equipment
- small plastic paint tray
- 6" mini woven acrylic paint roller
- wood glue
- super glue
- 4 oz. metallic acrylic craft paint (copper/rose gold pictured)
- new, clean 2-inch paint brush
- paper plates
- 1 quart washable interior satin paint, off white
- mini hacksaw or small wood cutting tool
- two 1/4-inch wooden dowels, 48-inches long
- "Bundt" and "Bar" laser cut wooden signs (see blog post for online source)
- 24x48-inch hardboard pegboard
- plastic painter's dropcloth
- painter's tape
- graphite pencil
Instructions
Step 1: Paint the Pegboard
- Put down a painter's drop cloth to protect floors or other surfaces. Lay the pegboard flat, or prop up on a work easel. Shake the container of paint and pry the lid off, then stir. Pour a small amount of paint into the reservoir of the paint tray. Prime the paint roller, and roll the paint onto the board, until it is evenly and completely covered. If another coat is needed, let the paint dry 20-40 minutes and roll on a second coat of paint. Let dry at least 30 minutes before the next steps.
Step 2: Paint the Bundt Bar Sign
- Lay the laser cut signs down on a tabletop protected from paint with some of the drop cloth, or paper. Shake a container of metallic gold craft paint and pour onto a paper plate, and brush the paint evenly onto the signs. Let the paint dry 10-15 minutes and paint on a second coat. Metallic paint tends to be transparent, so a second coat of paint will give the unfinished wood a richer finish.
Step 3: Paint the Wooden Dowels
- Lay the wooden dowels down flat on a tabletop protected from paint with some of the drop cloth, or paper. Coat each dowel with two coats of the white paint. Let dry at least 30 minutes, and then mark them in 2" lengths with a pencil.
Step 4: Paint the Angled Metallic Corner
- Mask an angled area of the pegboard off with two overlapping strips of painter's tape. The double stip will protect the rest of the board from overpainting, and give you a clean edge for the angled design on this donut board. Pour more of the metallic copper paint onto a paper plate or paint tray, and prime a clean paint roller with it. Roll two or three coats of the copper paint evenly onto the masked area, waiting at least 20 minutes between coats of paint. Let this area dry for at least 2 hours before removing the painter's tape.
Step 5: Prepare the Wooden Pegs
- Cut up the dowels into 2" lengths with the mini hacksaw to form pegs. Paint the ends of the pegs and let dry.
Step 6: Place and Apply the Bundt Bar Signs
- Turn the pegboard around so that the metallic, angled design element is at the bottom of the board. Hold the Bundt sign up in the right hand corner of the board at least 2" in from the the right hand edge and top of the board, and lightly mark the placement with a pencil when the sign looks straight. You can stagger the Bar sign down below the Bundt sign, or you can line it up next to it, or even underneath it. When you decide how you want the Bar sign placed, be sure to mark the placement with a pencil also. Lay the Bundt sign facedown first, and apply super glue gel to the back of it, following the lines of the letters with the glue, being careful to not get the glue too close to the edges. Carefully lift the sign and place it in line with the pencil markings, then hold in place on the pegboard about 2 minutes, until the sign sticks into place. Follow the same steps for the Bar sign.
Step 7: Place and Apply the Wooden Pegs
- Starting at least three rows down from the lowest part of the Bundt Bar signs, place the pegs in the holes. Base the space between them on the size of your mini bundt cakes, and also allowing for at least an inch between cakes. Mini Bundt cakes average 3" to 4" in diameter, so place the pegs 5" to 6" apart. Do not glue the pegs into place during this process-if any pegs are unevenly placed, you will still be able to adjust them. Leave all the pegs in place until you are ready to glue them to the board. One at a time, dot wood glue or super glue gel onto the outer end of each of the painted wooden pegs, then place it back into its hole. Leave at least 1.5" of the peg sticking out the front of the board. Hold each peg in place at a slightly upward, at least 30 degree angle until the dowel sticks to the board by itself. This will keep the cakes from sliding off. Let the glue set up at least an hour before moving the board, or hanging any cakes on it.
Step 8: Create your Bundt Bar Display
- Bake enough of your favorite mini Bundt cakes, or stop by your favorite local bakery and pick up enough scrumptious mini Bundt cakes to add to this board. When you're setting up, display it on a wall by hanging the board from nails hammered through holes in each corner, or prop the board on a sturdy easel, and hang a cake by the hole on each peg.
Notes
Use different colors and flavors of mini bundt cakes, and alternate them on the board for the nicest presentation.