Make Your Own Reusable Beeswax Wraps
Ditch the single use plastic and DIY your own Reusable Beeswax Food Wraps. They're durable and convenient with antimicrobial properties. You can find the ingredients to make them for purchase online, and linked in the blog post.This recipe uses a 2:1 ratio of wax to rosin. The volume measures can be scaled up accordingly to make more than 4 wraps. Use an old baking sheet that you don't care to ruin for baking jobs, and keep it for strictly making wax wraps.
Yield: 4 wraps
Equipment
- steam iron
- 9x13 baking sheet
- parchment paper
Materials
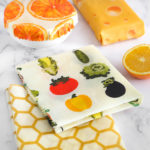
- 4 pieces prewashed cotton cloth approx. 8x10 inches
- 1 cup beeswax pellets or shavings
- 1/2 cup powdered pine resin
- 2 tbsp jojoba oil
Instructions
- Place the grated wax and powdered resin on the baking sheet. Drizzle over 2 tablespoons of jojoba oil. Place the pan in a preheated 300°Foven for 2 minutes or until melted.
- Stir the melted mixture gently with a spoon, and then dip a piece of cloth into the melted wax. Dip and re-dip until the cloth is completely saturated, using half of the mixture. The wax will be hot, but not so hot that you can't handle it with your bare fingers. It is ready when the cloth seems like it is almost too heavy and saturated with wax.
- On a parchment-covered work surface, lay the saturated cloth on top of a piece of unsaturated cloth the same size or smaller.
- Cover the stacked beeswax wraps with a large sheet of parchment paper and use a low heat iron to press the beeswax dip into the second piece of fabric. The wax from the top piece of fabric will transfer to the bottom piece.
- Peel the two pieces of fabric apart. You should see that the second piece of fabric is thoroughly infused with the wax medium. If it isn't, re-cover and iron again. Allow the beeswax wraps to dry on the parchment paper ,or clothes-pinned to a hanger, until they are firm to touch.
Notes
After use, beeswax wraps can be washed in cold water with mild dish soap. Allow them to air dry, and then fold them up for storage.
To make bowl wraps, use a large bowl turned upside down as a template. Use a pencil to draw a circle around the bowl rim then cut out with scissors. You'll need to use a bowl that is larger than the bowl you intend to cover, so that it overhangs the edges.
Use pinking shears to create a cute zig-zag edge on your fabric. This is not necessary but makes them look a bit more high end.